|
FRONT BRAKES
(Front Completed)

10/02/2010
|
- |
STOCK BRAKES:
The stock Fiero brakes are not half bad and are more than adequate to stop quickly an aggressively driven stock V6 or 4cyl Fiero; however, one of the biggest complaints in the stock 84-87 system
is the presence of brake-fade. This is where the brakes heat up significantly enough to cause them to lose their braking capability. The result of brake fade means the car will not stop as quickly, and can cause damage to the braking components in the form
of rotor glazing and warpage. If you've made it to my site looking for upgrade possibilities, consider first what you hope to get out of your braking system. Since my car will be mildly upgraded with slightly larger displacement and
horsepower, I wanted to improve my braking capability since I've often suffered from brake fade. I went with what is called the "Grand Am" brake upgrade. These brakes not only look good, but are superior to the factory brakes. They also
fill out the stock 15" wheels, but will still fit behind the stock 14" wheels. I will walk through the process of installing the Grand Am brakes on my Fiero.
*NOTE: If you want to retain the stock braking components, but want to improve your braking capability, you can go with cross-drilled and slotted versions of the factory rotors, as well as an improved set of brake pads. I used this
combination at one time and I never experienced brake fade ever again.
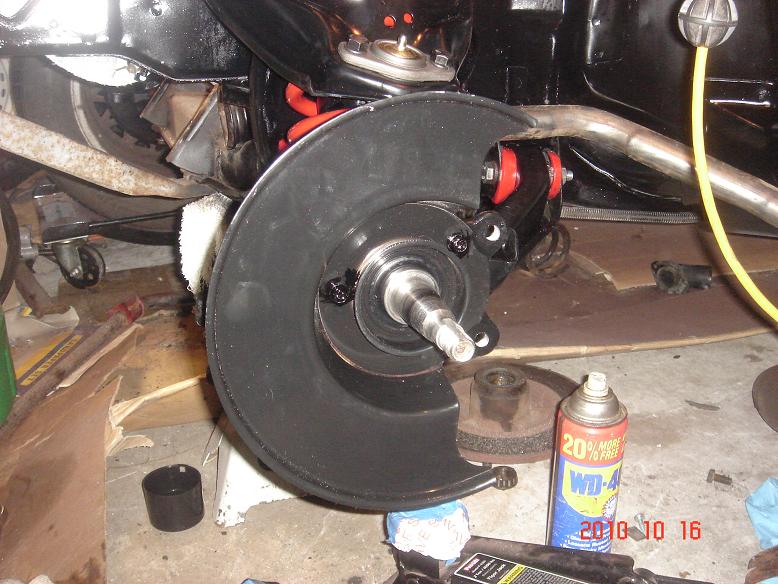
Below is my stock braking system before tear-down.
|
|
|
|
10/15/2010
|
- |
BRAKE UPGRADE / ASSEMBLY:
Tearing down the brakes are essentially no different than what was covered in my suspension rebuild, so there's no real benefit to anyone for me to rehash that here. If you are interested in seeing the process
that I went through to dissasemble my suspension, you can view that page here: http://www.pontiacperformance.net/CarPages/car87FieroSE_Suspension.html
Starting with a fully rebuilt stock suspension, I've decided to upgrade my factory braking system. The upgrade that I've decided to go with requires no modification to the suspension hardware or components.
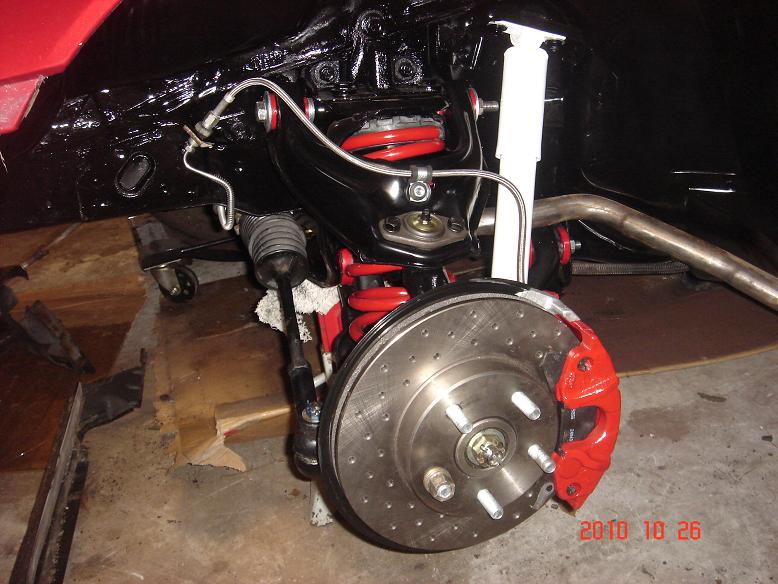
You simply need to start off with a clean, steering knuckle. The factory brakes would normally include a solid rotor with integrated bearings. I've opted for what's called the "Grand Am" upgrade which increases
the rotor size by roughly 3/4s of an inch, and with decreased brake fade due to the rotors being vented. I also opted for the one-up from that by ordering my rotors with the cross-drilled feature.
My new brake upgrade / rebuild includes the following:
- Fiero Store 84-87 Vented Front Brake Conversion Kit (IE: Grand Am Upgrade)
- Fiero Store - Cross-Drilling Option for Conversion Kit (To include cross-drilling to above package)
- Fiero Store - Pads for Brake Conversion Kit (Replacement Pads to fit upgrade kit)
- Fiero Store - Big Bore Master Cyl (Required for Grand Am upgrade)
- Fiero Store Earl's Stainless Steel Braided Hose Kit
- Fiero Store OER Dust Shields (OER powdercoated replacements)
- Fiero Store Bearings & Seal Kit (x2 Inner / x2 Outter Bearings + Seals)
- Fiero Store Entire OER Replacement Brake Lines (Stainless Steel, Superior to OEM)
[REBUILD PROCESS - FRONT BRAKES]
1 - The first is making sure you are starting with a very clean steering spindle. Use plenty of WD-40 and brake cleaner to make sure that the surface is clean and not damaged. Once the spindle is clean, you can start the installation. The first
component of the brakes to go on are the dust shields. These cannot go on after the fact. If you put the rotor on first, you will not be able to instal this later. The dust shield mounts with three 10mm bolts. You don't want this shield getting loose
so I recommend using blue-LocTite on the threads. For a stock rebuild, these can be installed as is. If you are going with the front brake upgrade like me, you will need to bend them slightly to ensure they do not interfere with the rotors. I found the
easiest way to prepare them was to put them open side down on a concrete floor and stand on the top of it. This will help flare the sheild outwards a little bit and away from the rotor so it will not make contact. Once this is installed, you can move on
to preparing the wheel hub.
2 - The second step is to prepare the wheel hub assembly. If you are doing a factory rebuild, the rotor and hub are one unit. In my case, the hub is a shaved down factory rotor made to accomodate a Grand Am rotor. You'll want to take the
hub assembly and insert the INNER wheel bearing into the hub. Before doing this, you'll want to make sure that you properly pack the wheel bearing with as much grease as possible. Work synthetic grease into the bearing with the palm of your hand
and make sure you've filled every cavity of the bearing with grease. Once this has been installed properly into the hub, you will want to install the hub seal next.
3 - The third step is installing the hub seal. This installs with the ridged part inwards. It should be installed with care ensuring that it is not bent and / or deformed. It can easily be installed by using a hammer to lightly tap it into place, making sure you
tap in a circular motion around the seal until it is fully seated. You can now install the hub onto the steering spindle. Using regular motor oil, lubricate slightly the seal so that it has some lubrication on the shaft. The hub should slide on, and the bearing should seat itself
without much difficulty. The next step will be to install the outer bearing.
4 - The fourth item is installing the outer bearing. However, before you attempt to do this, I recommend filling the open cavity between the hub and the spindle with a liberal amount of synthetic machine grease. Because the hub and rotor assembly are part of a rotating assembly,
Any grease that is inside the hub will be forced to the outsides and inner walls. This helps keep the bearings lubricated in that the grease is naturally forced into this area. As a general rule of thumb, I like to make sure that at least 1/4 of the area is completely filled with
machine grease. There's no problem with adding more, but it's not really necessary. Once you have packed some grease into there, you can install the outer bearing. As with the inner bearing, make sure you have properly packed the bearing. Insert the outer bearing with the concave side
towards the spindle. This should be followed by the spindle washer, and castellated nut. The nut should be tightened down enough to ensure that the wheel still spins freely, but that there is absolutely no play in the hub assembly. I find that a 1/2 additional turn is a good measure.
Install the new cotter pin, and install a new dust cap.
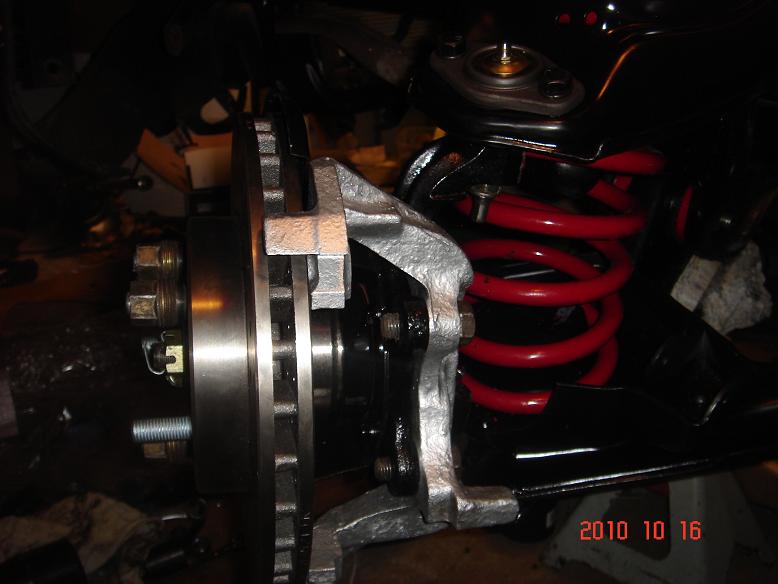
5 - The next, and fifth step is installing the caliper mounting bracket. These brackets are side specific, so make sure you install the appropriate one on the correct side. For reference, the LEFT side of the car is always considered the drivers side. These brackets
are modified SLIGHTLY from stock in that they are drilled for slightly larger bolts over stock. This only applies if you are doing the upgrade like me, otherwise they are identical. I found it easiest to install the rotor onto the hub, and fasten it with a single nut
just so I know that the bracket is being installed correctly. Refer to picture 4 below for what it should look like installed. When installing this bracket, make sure you use blue Loc-Tite, you do NOT want these bolts backing out when you're doing 130mph.
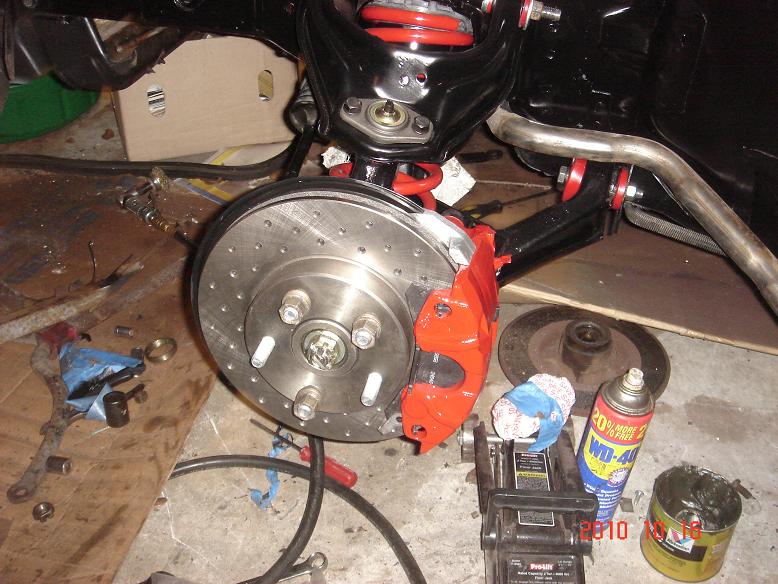
6 - The next step is to install the pads and calipers. The calipers are pretty self explanitory, and they only install in one direction. The bleeder screw should be at the top. I recommend using a new intermediary line between the body lines and the caliper. MAKE SURE you replace
the copper bushing, although reusing the banjo bolt is acceptable. I highly recommend buying a set of flared crescent wrenches when working on the brake or fuel system. These fittings are very prone to stripping, galling, and rounding off and these flared wrenches will prevent this.
You can buy an inexpensive set from Harbor Freight, or a more professional set from Sears. Additionally, I have decided to replace all my body lines. This is typically not
necessary, and it certainly wasn't for my vehicle either, but I felt that since I was going through this effort, I might as well upgrade them with stainless as well.
|
|
|
|
|
|
STAINLESS HARD BRAKE LINES
12/26/2010
|
- |
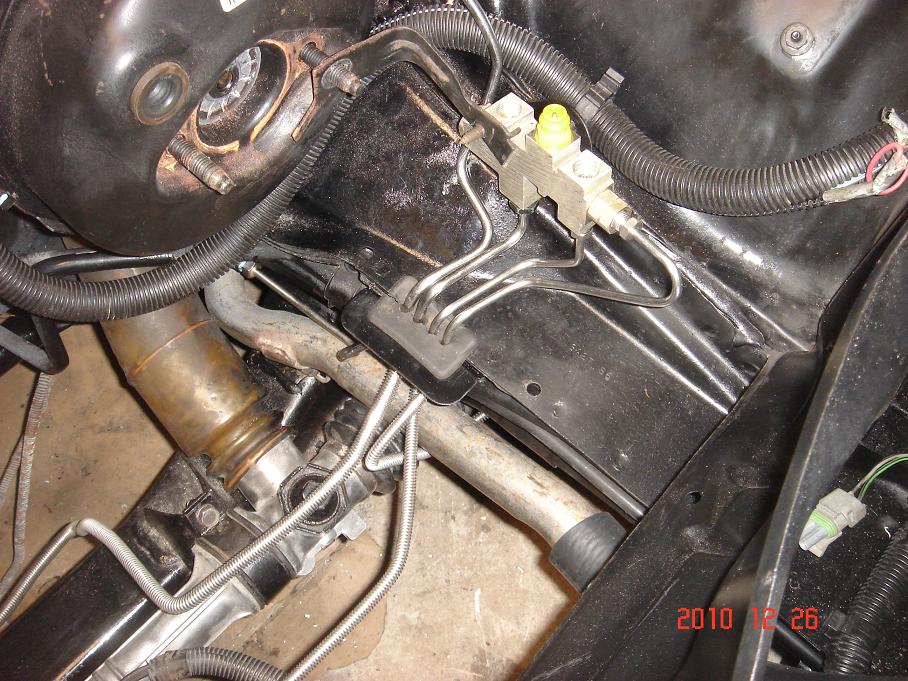
BRAKE LINES (BODY):
Although the brake lines on my Fiero were visibly still ok, I didn't want to run the risk of contaminents in the lines affecting other components of my system.
With this, I decided to replace all of the brake lines with brand new stainless steel lines from the Fiero Store. The fit & finish were decent, but required a
little bit of massaging at the point where they all funnel into the rubber grommet in the front under-hood compartment. Rather than re-using a lot of the older
clamps, I purchased a set of rubber insulated clamps from Harbor Freight and used those instead. This will help to minimize some of the squeaks that the car might
have developed over the years. All of the lines attach at the brake proportioning / metering block just forward of the brake booster. As you can see, I've also
decided to re-use the original brake booster. Believe it or not, the brake booster was still holding pressure from the last time I had started the car, which was literally
two years ago. This tells me that the booster is still in good shape, and there was no reason for me to replace it.
|
|
|
|
|