  |
|
In this tech article, I outline how to upgrade all 1992 to 2011 Crown Victorias with the rare "Underbody Security Lighting System." Also known as "puddle lamps", this option was offered on
all Crown Victorias, Grand Marquis, and Lincoln Town Cars for several years in the early to mid 00s. Although this option was never installed on any vehicle before it left the factory, it was a fully sponsored "factory
dealer option." Essentially, this means the option was Ford designed and Ford sponsored and was installed at the dealership by service reps. The option could be ordered when special ordering a car or an appointment could
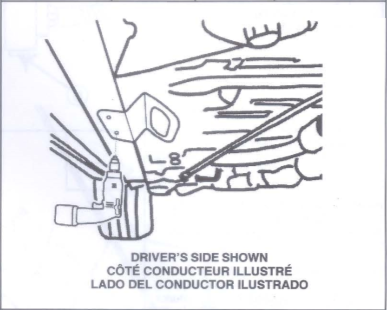
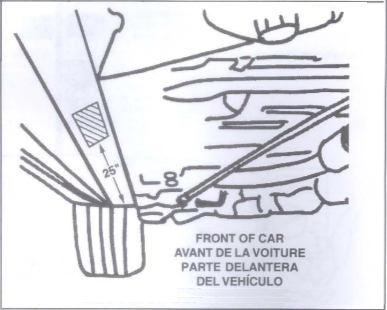
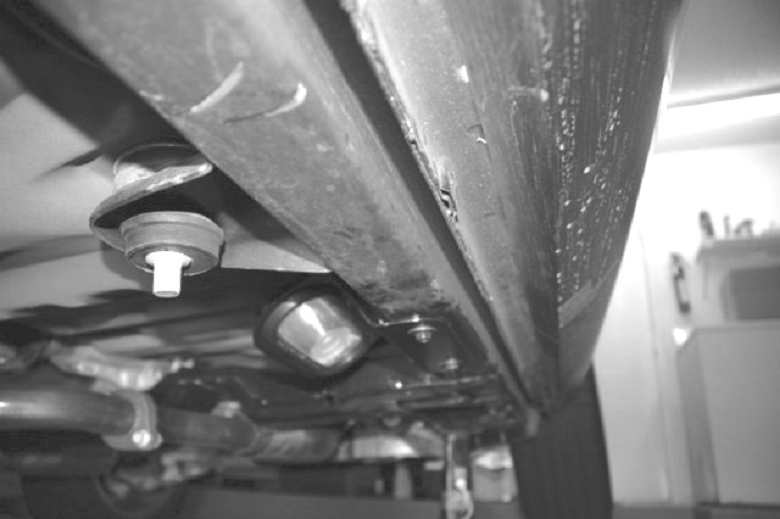
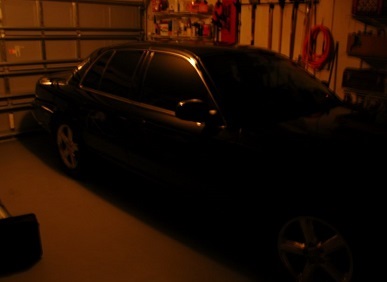
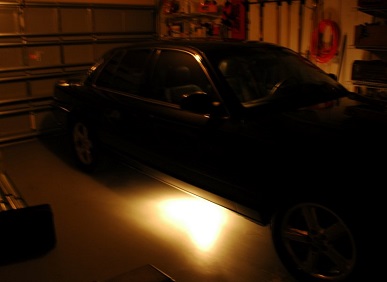
be made to have it installed after the fact.  I haven't been able to determine exactly when this option was first offered by the Ford dealer network; however, I suspect it was probably introduced after the elimination of the door courtesy lighting in 1997. I do know that it was at least offered in my 2002 Crown Victoria as it's listed in the sales brochure for that model year. 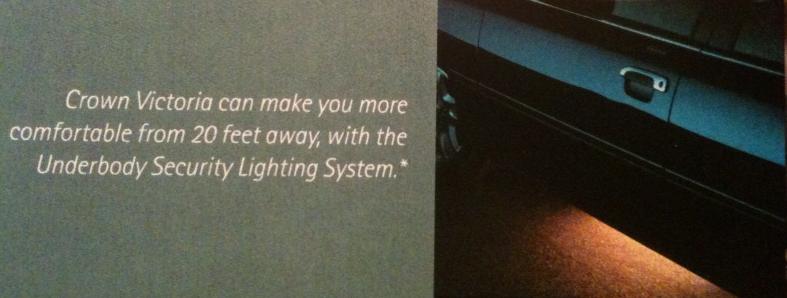 As shown above, this available feature provide what was called "puddle lighting" for the customer's vehicle. Depending on how the vehicle was equipped, an optional package was available known as "illuminated entry." This option group provided a number of features including area lighting for the vehicle on entry. For vehicles so equipped, the illuminated entry could be activated by unlocking the car with the key-fob, pulling up on the door handle, or physically opening the door. Depending on the year of the vehicle this would activate the outside ground illumination, interior overhead lights, floor and door mounted courtesy lights, headlights, and in the earlier years, the lighted key-hole. Vehicles without "illuminated entry" functionality would simply have the ground illumination (if installed) activated only when the doors were open. The purpose for this lighting is fairly self explanitory. *Illuminated Entry - Throughout the years, Ford motor company began to "decontent" their vehicles. Decontenting is the practice of eliminating functionality and features that would otherwise be unnecessary in order to save on production costs. Illuminated entry, while available through most years, was no longer standard after a certain year. In 1995, illuminated entry included the following: - Illuminated door locks - Interior floor illumination - Automatic headlight illumination - Door accent lighting By 1998 however, everything was eliminated except the automatic headlight illumination and the interior floor illumination. When installed by the dealer, the Underbody Security Lighting System was integrated with the illuminated entry because it would provide lighting not only when walking to the vehicle, but upon exiting the vehicle as well. I wanted to match the dealer installation / configuration, so this is how I proceeded with my install as well. Unfortunately, these kits are no longer being offered by Ford Parts, or by the dealerships themselves. In fact, the majority of the parts necessary are nearly impossible to find. A few years ago, a member on the Mercury Marauder forums bought up all the last remaining brackets and lights that he could purchase from the original Ford supplier and began piecing together install kits (w/ instructions) based on the original hardware. I had the opportunity to purchased one of these kits so I jumped at the chance. This is what was included in the kit that I received:  (Click here for another picture of the underbody lighting kit pieces) Although technically these kits are no longer available, most of the non-specific pieces can be purchased from other sources such as the wiring and relays. The truck lights are also available at any truck accessories store as truck reverse / back-up lights. The grommets should also be available from the same accessory store. The only component which cannot be sourced aftermarket is the FoMoCo lighting bracket. If there is enough interest, I can take exact measurements and post them up here so that others can duplicate them. It shouldn't be too difficult for someone to reproduce with a metal break and some 1/8th inch thick sheet metal. This kit included the following parts: - 2x Truck-Lite Super 60 sealed beam bulb w/ Polycarbonate lens - 2x Truck-Lite Super 60 rubber installation grommet - 2x FoMoCo lighting brackets (no longer available) - Cable Ties - Wire Harness w/ relays - Screws, Hardware, wire splice connectors Installation: The installation for this is pretty straight-forward. I have scanned and included the original installation instructions at the bottom of the page; however, I will detail my installation breifly here as well. Note, if you would like to install this option but making the FoMoCo brackets is not feasible, there are other lighting options which may be substituted. This can including LED strips either under the door or the rocker panel. Step 1: Preparation - Disconnect the battery to prevent accidental shortage of any circuits, or the potential for fire. Step 2: Pre-Assembly - The lights will need to be installed into the bracket prior to installation as this task becomes substantially more difficult after the brackets have already been installed. It's adviseable that you test fit the brackets to the frame so you understand their orientation before pressing in the lights. The brackets mount to the frame on the inside with the lamp facing downward, shining towards the outisde of the car. 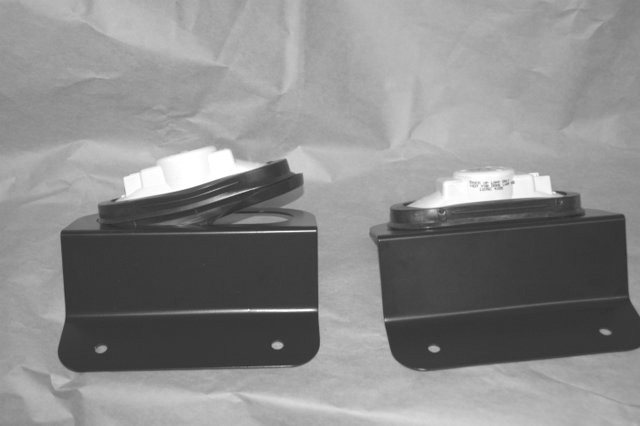 Step 3 Pull Back Carpet: - To expose the floor pan, remove the threshold trim by using a plastic trim removal tool to pry it off. Adjust the passenger and drivers seat all the way back and pull the carpet back. You do not need to pull it completely back, just enough to expose the two grommets on either side. You should identify a forward and rear-facing grommet. 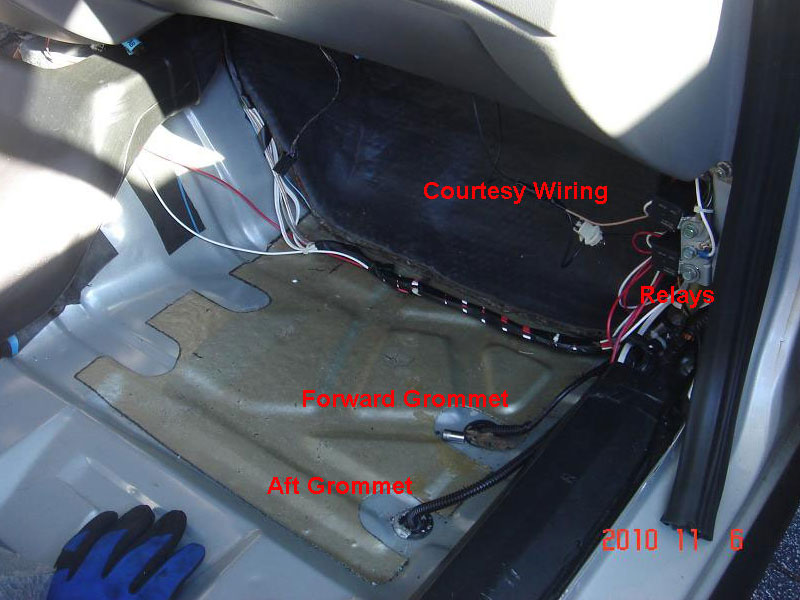 (Click 1, 2, 3 for larger views) Step 4 Wiring: - Begin by cutting a small "x" into the center of the rear-most grommet. You will need to feed the wiring harness from the lamp into this grommet from the underside. The connector for the lamp should obviously be on the ground with the wires being fed from the bottom in through the floorboard grommets. I find that it's easier to do one side at a time. I recommend doing the passenger side last as this is where I suggest installing the relays. In the picture above you will see two relays. These relays were included in the kit as the original installation procedures required that the kit be disabled while the vehicle is in "run." This is to conform to several state laws which make ground illuminating lights illegal while on the street. If this is a necessary requirement for your installation, you will want to connect a second relay which disables the power feed to the first relay. The Pink w/ Black wire in the Crown Victoria is the "hot on run" and can be tapped into for this purpose. The primary relay will essentially feed power from the "Always Hot" wire which is the thicker yellow +12v wire in the Crown Victoria. This wire is always hot, and is necessary to ensure that the lights function for the "on-entry illumination" feature. The "switched" portion of the primary relay should be connected to the vehicle's courtesy lighting circuit. This is the Black wire w/ the light blue stripe. Please refer to the chart below for a detailed circuit diagram. 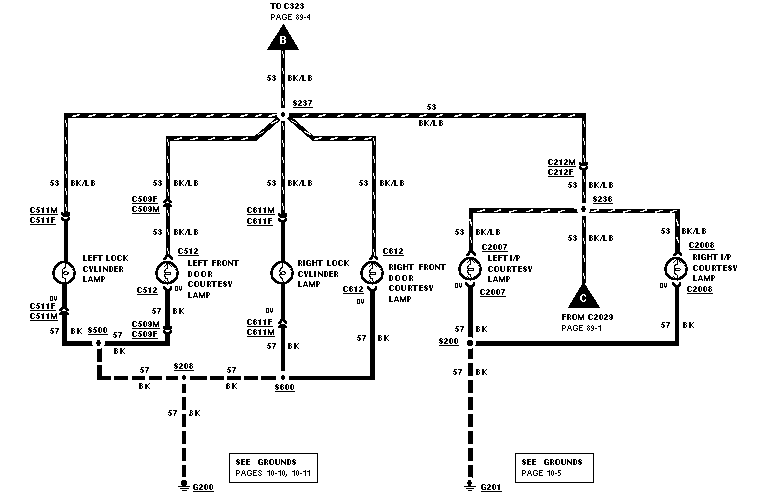 (Illluminated Entry - circuit diagram) Step 5: Mounting Relays - I found the best location to mount the relays (with easiest access) is behind the passenger side kick panel. This location is easy to get to in case of relay failure. It's a clean, relatively uncluttered area. Please refer to the image below: 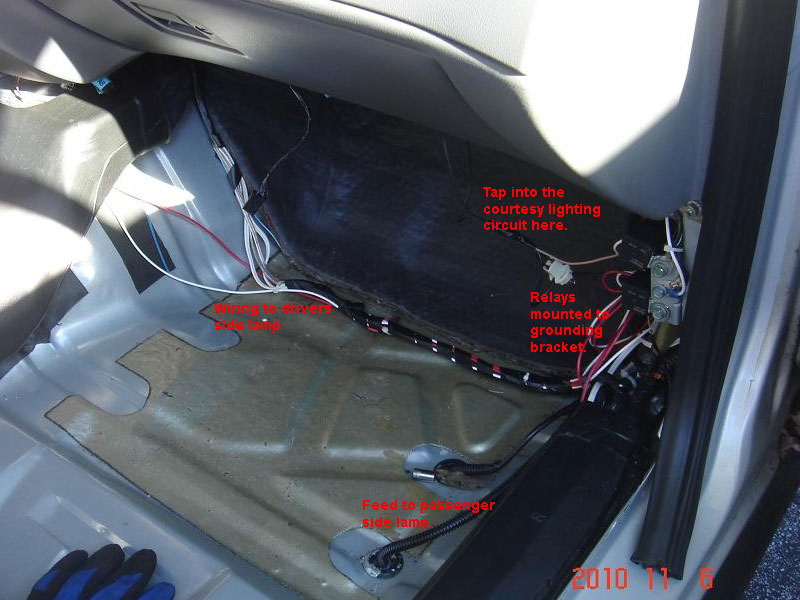 Step 6: More Wiring - Attach the wire from the drivers side lamp to the underbody security lighting circuit. This wire can be draped over the driveshaft tunnel and under the heater vents as shown in the image above. Step 7: Mounting the Lamps - Depending on what direction you took with this installation, the lights will need to be installed to the vehicles frame. The factory mounting location required that the brackets be mounted 25"s back from the front wheel well. Two holes will need to be drilled with a steel cutting drill bit. Self tapping screws were provided in the kit, but this is what you will want to use if doing a similar installation to the factory install.
Step 8: Final Steps & Testing - Double check everything and when confident, reconnect the battery. Verify that the light comes on with the keyfob, and that it dims and disables when the lights extinguish inside the cabin.
Note: For detailed instructions, download the following manuals: - Ford OEM dealer installation manual: 1999 Ford Dealer USLS Installation Manual - Aftermarket installation manual: Page 1, 2, 3, 4, 5, 6, 7, 8, 9, 10, 11, 12, 13, 14 OTHER LIGHTING UPGRADES: - Courtesty Door Lighting in a 1997-2002 Crown Victoria / Grand Marquis, click here: Door Courtesy Lighting - Courtesty Floor Lighting in a Police Interceptor, click here: Floor Courtesy Lamps - Cigarette Socket Illumination in a 2000-2002 Crown Victoria / GMQ, click here: Cigarette Socket Lighting |
|
|