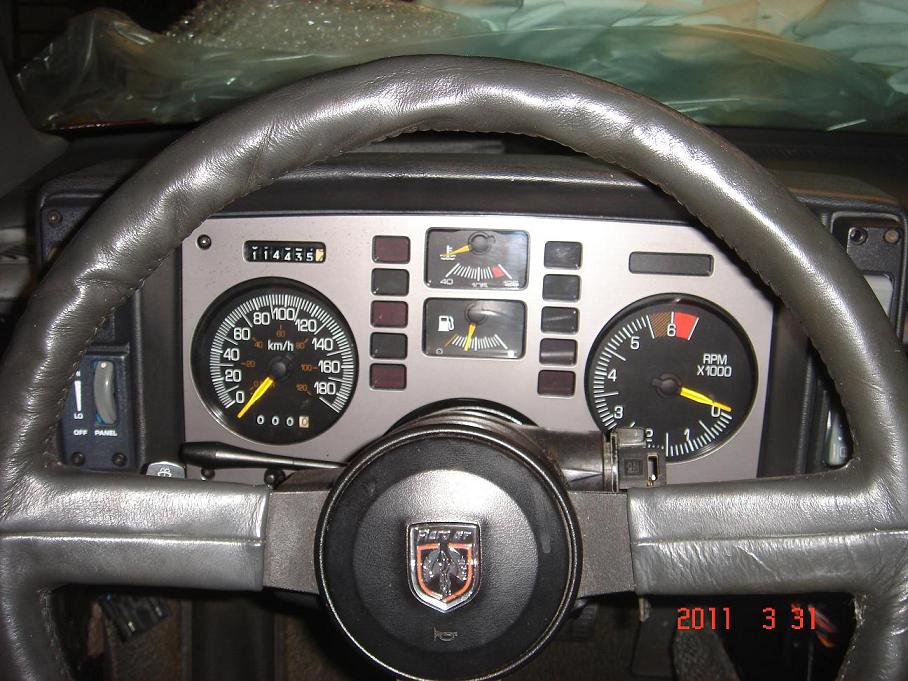
ELECTRICAL RESTORATION / UPGRADES


Below is a quick run-down of the rebuild, restoration, and upgrading of the electrical systems on my 1987 Pontiac Fiero SE/V6. Here are some quick links to go directly to the section you're looking for:

  - Upgraded Radio Harness Installation

  - Metric Guages - Conversion

  - Metric Gauges - Installed

  - Speaker Repair / Install (Subwoofer)

  - Speaker Repair / Install (Front)

  - Speaker Reapair / Install (Rear)

  - Installing the Clutch Safety Switch

  - Re-Installing the ECM / Reprogramming


ELECTRICAL / WIRING


As with pretty much everything on this car, it's generally in good shape. There were no particularly bad issues with wiring before I took the car off the road. One issue that I did have was that the parking lights / dash lights would trip every time I turned on the radio. I've narrowed this down to a poorly made wiring harness on the radio that I installed when I attempted to upgrade from the 12-pin to 21-pin. This is one of the things I will remedy in restoring the car. In addition, there are a number of factory options I will be adding that my car didn't originally come equipped with. In most cases, I will be using all factory wiring, and will be installing these components in the factory locations. Fortunately, I know nearly the entire history of this car because I've owned it since 1996. Unfortunately, it's been at the mercy of my learning curve. Below is a picture of the rat's nest of wiring garabge that I've pulled from the car. My handi-work includes a radio upgrade, a power door lock upgrade, and a power mirror upgrade. Surprisingly, most of it all worked!


RADIO HARNESS


3/2/2011
- RADIO WIRING:

I've gutted the interior of my Fiero in an attempt to repair any wiring issues my car might have had. Before I started tearing down my car, it had a wiring issue where the radio would stop working as soon as I turned on the lights. It appears as though maybe I had screwed up the wiring at some point. I give myself a break though because most of the wiring I did was when I was still a teenager.

When I first purchased my car, it came with a Sony CD player. The factory harness had been hacked into and an adaptor harness was spliced into it. I cut the factory 12-pin harness lead off a junkyard Fiero, and spliced it back into my factory harness.

Part of my restoration includes upgrading the car to literally all the options, so that means installing the factory subwoofer system as well. I carefully dismantled the subwoofer harness from a junkyard car years ago, and now was the opportunity go about installing it correctly. I attached the intermediary harness and affixed it to the frame rail as it would have been from the factory. The subwoofer basically has an adaptor harness that goes IN-LINE between the factory radio harness, and the radio itself (diagram 1, diagram 2). This allows all four speakers to get processed by the 3-way amp, including the subwoofer.

In addition to the factory subwoofer, I also wanted to upgrade to a slightly newer radio, but one that would match the factory look and feel of the interior. For this, I went with a CD player from a 1988-1991 Pontiac Bonneville. It retains the identical buttons and look of what would have been offered in the 1987 / 1988 Fiero. The adaptor harness that was needed converts the 12-pin OEM harness and 2-pin power feeds, to the newer 21-pin connector.


METRIC GAUGE MOTORS


3/26/2011
- METRIC GAUGE MOTORS:

Probably lame, I know... but I thought the Fiero's gauges would look "cooler" if I installed a set of METRIC gauges. The Fiero was sold both in the US as well as Canada. All Canadian Fieros got Metric gauges. The 85mph Fieros got 140kph gauges, and the 120mph Fieros got 180kph gauges. To view a set of COMPLETE metric gauges, click here.

Aside from the speed measurement differences, the temperature is in celcius, the oil pressure is in BARs, and the fuel gauge doesn't display the UNLEADED ONLY warning (can you even buy leaded gas anymore anyway). I wanted to keep my actual mileage correct, and in miles, but wanted to dsplay it in kilometers. I discovered that the speedometer has a series of motors. One motor powers the speedometer, while the other motor powers the odometer. Both of the motors take input from the vehicle speed sensor. Through some research on Pennock's, I discovered that there are TWO sets of motors; motor "M" #8691, and motor "K" #8692. Put simply, "M" for miles, and "K" for kilometers. It couldn't have been better. I simply took my odometer bar and "M" motor from my original gauges and installed them in the Metric Canadian gauges. Odometer in miles, speedometer in kilometers.


METRIC GAUGES / INSTALLED


3/31/2011
- METRIC GAUGES:

I made a bit more progress, and installed the gauge cluster / assembly into the dash / steering column. Although I live in America, and have never lived in Canada, nor am I Canadian, I thought the metric gauges were a nice touch to the car. Being that the Fiero is mid-engine, although certainly American ingenuity, it's very European in it's styling. I thought this added a bit of an exotic feel to it. It's kind of ricey, I know, but it's a factory set of gauges that came installed in the 
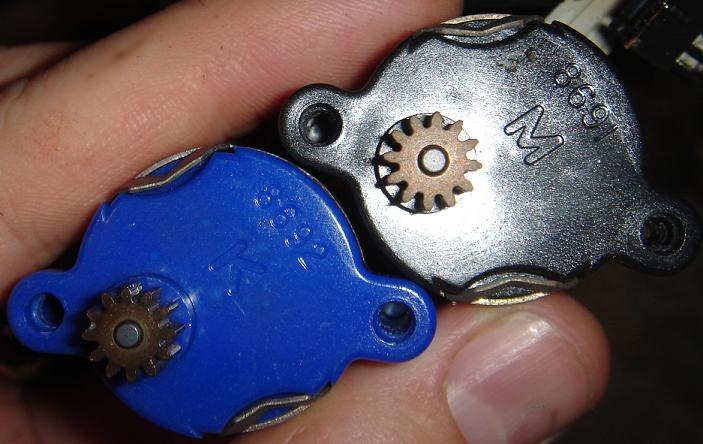
Canadian cars. The speedo shows 180kph, but also shows the miles per hour in smaller print. As explained above, I swapped out the odometer bar with the original one to the car (so the mileage would be correct), and I replaced the metric odometer motor with the standard motor. The car will read the speed in kilometers per hour, but will measure distance in miles.

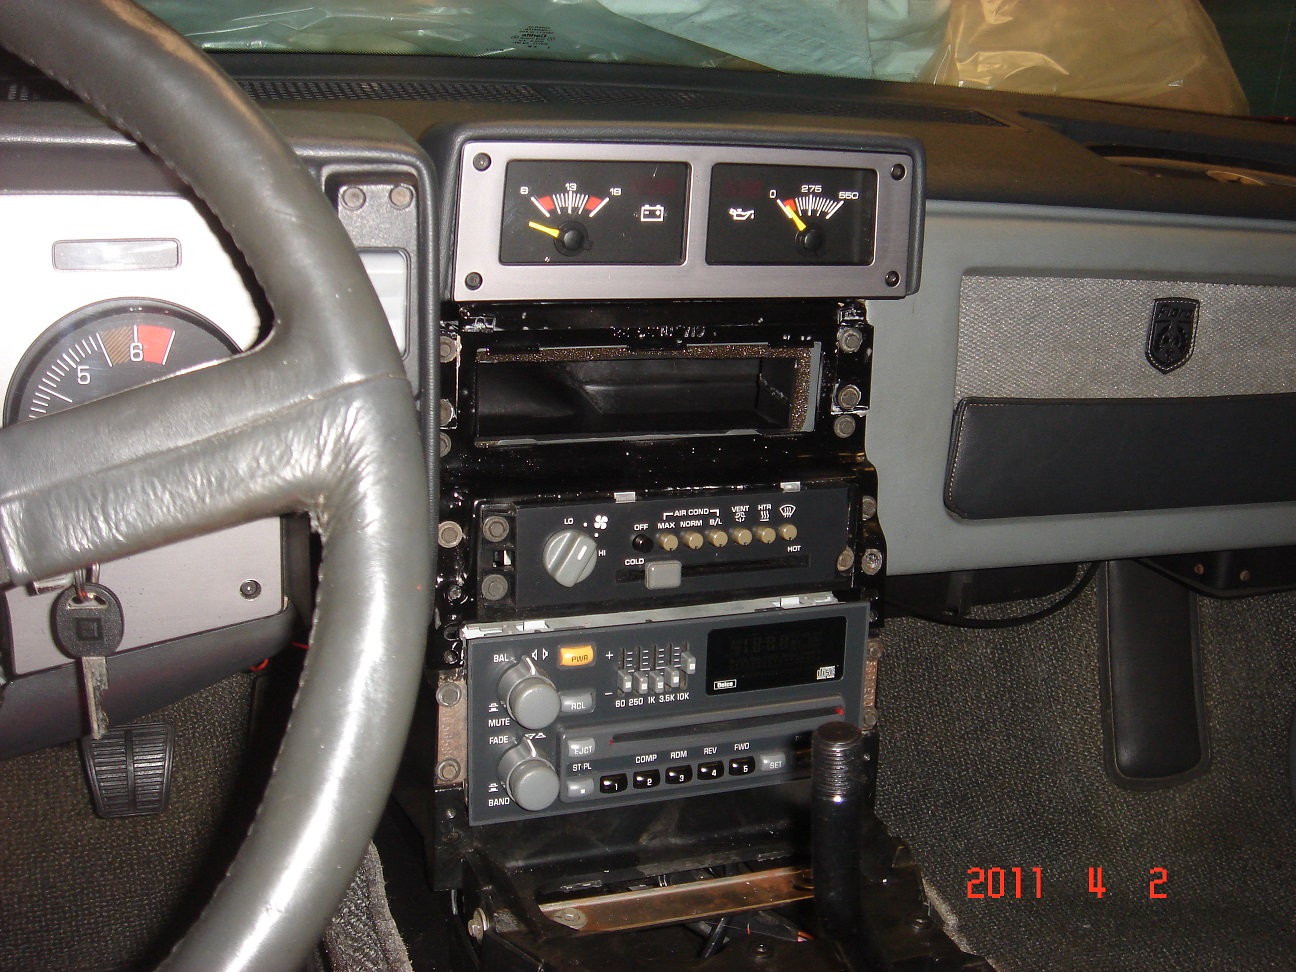
I also mixed and matched a few other things, including the auxilary gauges. For the main gauges, I also used the fuel and temperature gauge from the metric set. In the auxilary cluster, I used the BAR gauge from the metric set, but kept the volt gauge from the standard set.


SPEAKERS - SUBWOOFER


3/18/2011
- Subwoofer Repair:

In upgrading my stereo with the factory subwoofer system, I've decided to replace the speaker. The original factory speaker is completely destroyed from dry-rott. Rodney Dickman sells a quality, low-cost replacement speaker on his website. To install his speaker requires very little modification which includes drilling four mounting screws on the internal speaker bracket. The speaker is the best option for the factory AMP circuitry as it's matched appropriately with the frequency output and wattage. It is actually an upgrade to the factory speaker, but is sold as an OEM style replacement. The kit from Rodney also comes with new gaskets to properly seal the front of the chamber.


SPEAKERS - REAR


3/28/2011
- Rear Speakers:

I'm getting nickle and dimed to death on this restoration. I didn't want to put back the old paper speakers, but also didn't want to spend a lot of money. The factory speakers are ok for the most part, but they are (interestingly enough) exposed to the outside elements. The rear sail-panels also act as side-vents to help air flow through the vehicle. The back-side of the speaker is exposed to this area, seperated only by a piece of plastic covered sound insulation that is simply stuffed behind there. The magnets were starting to rust, and there was some water staining on the speakers, so I decided to replace them. The biggest issue I had with the speakers was finding a set that had the appropriate mounting depth. I ended up going with a real inexpensive pair of speakers from BOSS Acoustics. BOSS makes relatively inexpensive audio components, but you do get decent quality for what you pay. I would say you're getting Alpine / Pioneer level of sound, with a cost cheaper than JENSEN. I went with a pair of BOSS BRS46 25-watt speakers. 25 watts RMS, 50 watts PEAK. 100hz, to 18Khz. They are significantly better than the stock speakers, only slightly deeper, and still fit in the factory speaker housing. I cut off the old speaker wiring harness, and utilized that so I wouldn't have to hack into the factory cabin wiring. I installed a set of water proof XTC foam speaker baffles behind the speakers to help seal the cabin and prevent them from being exposed to the elements. I simply cut around the excess foam.


SPEAKERS - FRONT


3/30/2011
- Front Speakers:

Not much to mention here, but I went ahead and re-used the older speakers that I had installed in my car previously. They are Pioneer TS-A4103 120watt speakers. I purchased them almost 10 years ago. They have some fading on the cone, but are otherwise in really good shape. Since they're so easy to get to, I see no need for me to want to replace them now. The only issue I might have is that they will be somewhat under-powered by the stereo. The RMS is 35 watts, and my radio will only be putting out 25. It shouldn't be a huge deal, I just won't want to turn the volume up that loud. I don't particularly remember it being an issue in the past. I also made correct harness connectors this time, I won't even mention how I had them installed in the past.


CLUTCH SAFETY SWITCH


3/28/2011
- Safety Switch:

In converting the car from an automatic to a manual transmission car, it is necessary to modify some of the wiring. In this update, I am adding the "clutch start safety switch" to the clutch pedal. The safety switch prevents the car from being started in gear, in the same way that the automatic transmission couldn't be started unless it was in neutral or park. This requies me to add the safety-switch in-line of the starter excitor feed from the ignition switch. So as to do the least amount of damage to the factory harness as possible, I carefully removed the yellow lead on the ignition switch, keeping the spade intact. I then took the yellow ignition lead from the parts car I had, and spliced that into the yellow lead on the purple safety-switch pigtail lead that I have. I then took the yellow lead off the pig-tail, attached a spade connector, and attached that mechanically to the original yellow ignition lead. This left the factory automatic harness intact without cutting, but allowed me to add the safety-switch in-line. The safety switch is engaged only at full-depression of the clutch pedal.


ECM INSTALLED / PROGRAMMING


4/2/2011
- ECM INSTALLED:

Part of converting from an automatic to a manual also requires updating the comptuer's programming to reflect these changes. For the most part the manual Fiero will work fine with an automatic ECM, it simply requires terminating the TCC connector. In this case, I wanted to also upgrade the fuel and timing maps to reflect the increased displacement from 2.8 to 3.2, the larger fuel injectors (15# to 17#), and the improved Crane H272 camshaft.


More coming...

00/00/2010
- NOT STARTED


For any questions or comments, click here!
Copyright - PontiacPerformance.Net